Arduino NANO
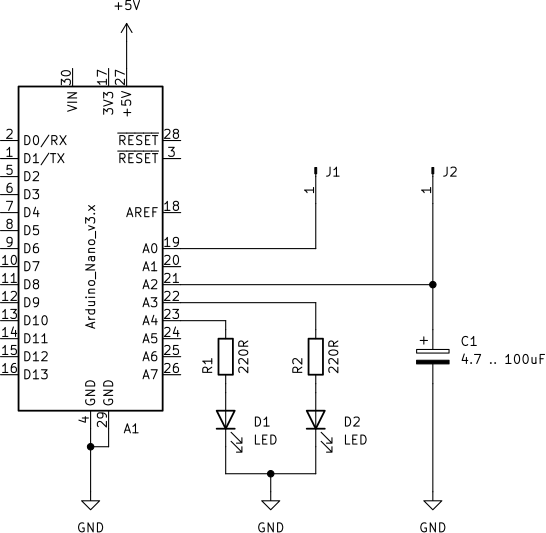
Schematic of Charge Blinker assembled with Arduino NANO.
 {#fig:blinker}
After assembling you must also program the Arduino NANO. The code can bi found bellow or in file ChargeBlinker.ino
After program is done you are ready to go. You can connect different objects between connectors J1 and J2.
NOTE: If the frequency of LEDs blinking is not appropriate you can change the capacitor C1:
- use larger capacitance to have lower frequency or
- use smaller capacitance to have higer frequency.
Code
#define PIN_C A2
#define PIN_R A0
#define LED_1 A3
#define LED_2 A4
#define LO_TRSH 307             // 205 = cca 1V ; 512-205=307 , 717
#define HI_TRSH 717

void charge_cycle();
void discharge_cycle();

void loop() {
  charge_cycle();
  discharge_cycle();
}

void setup() {
  pinMode(PIN_C, INPUT);
  pinMode(PIN_R, OUTPUT);
  pinMode(LED_1, OUTPUT);
  pinMode(LED_2, OUTPUT);
}

void charge_cycle(){
  digitalWrite(LED_2, 0);
  digitalWrite(LED_1, 1);
  digitalWrite(PIN_R, 1);
  while (int C_ADC=analogRead(PIN_C) < HI_TRSH){}
}
void discharge_cycle(){
  digitalWrite(LED_1, 0);
  digitalWrite(LED_2, 1);
  digitalWrite(PIN_R, 0);
  while (int C_ADC=analogRead(PIN_C) > LO_TRSH ){}
}
: ChargeBlinker code. {#lst:ChargeBlinker}